Extension Panels for Adobe Photoshop CS4
Panels are a new feature in Adobe Photoshop CS4. They make it possible to provide a high-level organization
and automation that pulls together a variety of functions normally found in many different menus, including
plugins. Those individual functions are still accessible in the usual ways, but the panel collects them
together and provides a logical arrangement that can be especially useful for those who are not intimately
familiar with the many capabilities that Photoshop offers.
In this initial offering, three panels have been created that should address a great many of the situations
that typical users of Photoshop and Fovea Pro encounter, particularly beginning users. This may also be a
useful learning tool for those who wish to examine the various functions in more detail, but to use them it
is only necessary to click on the buttons in the panel.
The Adjust Image Panel has 14 buttons, corresponding to 7 types of operations. In most applications, only a few of
these will be required. In many cases, the fully automatic options can be used, but manual functions that
allow for interactive adjustment of parameters are also provided. All of these routines first create a new layer containing
the current image and operate on that layer, preserving whatever has been done previously.
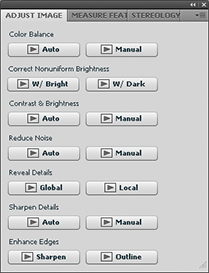
- Color balance. This is obviously not important if you are working with black and white images, or if the
actual colors in the image are not important and it is only color differences that matter, for example to
differentiate structures for later measurement. The Automatic method makes a neutral color assumption, which
is often appropriate for real world images but may not be for images from stained tissue in a microscope, etc.
The Manual method allows customized adjustment of the individual red, green and blue color channels.
- Nonuniform brightness. If the image is nonuniformly bright because of off-center lighting, vignetting, etc.,
it can often be corrected by automatically fitting a function to either the Brightest or Darkest features present
in the image, assuming that they are well distributed across the image area, and actually should all have the
same brightness.
- Contrast and Brightness. The Manual button brings up the Photoshop Adjust Levels dialog, in which the white
and dark points, and medium gray slider, can be adjusted. The Automatic button maximizes contrast and selects
an optimum gamma value for the image.
- Reduce Noise. Median filters are the preferred tool for treating random speckle noise. The Manual button brings
up the Photoshop median filter, while the Automatic button runs a plugin with a hybrid median, which better preserves
edges, lines and corners. It is important to reduce noise before any of the enhancement operations below.
- Reveal Details. Particularly in bright or dark areas of an image, fine details can be difficult to see.
These tools decrease the overall contrast so that a greater amount of contrast is available for details. The
Global button applies a homomorphic filter to expand the contrast for details of all scales in the entire image,
while the Local button is best for increasing the contrast of very fine local details.
- Sharpen Details. The visibility of fine details can be enhanced by increasing the local contrast. The
Manual button applies the popular unsharp mask routine, which can be interactively adjusted. The Automatic button
uses a plugin that avoids the "halo" effect introduced by the unsharp mask, and also deals better with steps in both
the bright and dark portions of the image.
- Enhance Edges. The steps and edges that define the boundaries of objects and structures are important for
both visualization and measurement. The Sharpen button applies a maximum likelihood operator to decrease the breadth
of transitions and thus increase the sharpness of edges. The Outline button brings up a selection of edge delineation
functions which can be interactively selected.
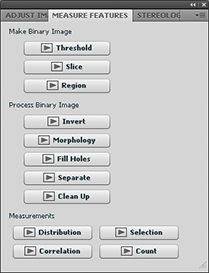
The Measure Features Panel has 12 buttons in three groups. In most cases, if the image has not been previously
converted to a binary (black and white) image in which the structure(s) to be measured are black on a white background,
the first step will be to choose one of the buttons to perform this operation. This image may require processing to
clean up feature edges, remove noise, fill holes etc., after which the desired measurements can be performed.
- Make Binary Image. The Threshold button allows a single threshold value to be set to separate light from dark regions.
The Slice button provides two thresholds for the upper and lower brightness settings to define the regions of interest.
Both of these functions also have automatic tools for selecting threshold values. The Region button allows clicking
on a point in the image whose color and brightness represent the areas to be selected, and setting tolerance values.
These routines first create a new layer containing the current image and operate on that layer, preserving whatever
has been done previously.
- Process Binary Image. The Invert button reverses black and white, since the background is sometimes easier to define
than the structures of interest. The Morphology button allows opening or closing operations to be selected to smooth
feature boundaries if required. The Fill Holes button fills any interior holes within features and the Separate button
separates convex touching features. The Clean Up button allows specifying the size (in pixels) of small features to be
removed, and optionally those toucing the edges of the image. All of these routines first create a new layer containing
the current image and operate on that layer, preserving whatever has been done previously.
- Measure Features. The Distribution button displays a histogram of the measurement data for the features, for any
selected size, shape, position or density parameter. The Correlation button displays a scatterplot relating any two
measured values for each feature, to reveal correlations between them. The Selection button displays a histogram for
any measurement value and allows setting limits to keep or remove features based on the measurement (this function
generates a new layer containing the selected features). The Count button simply shows the number of separate black
features present.
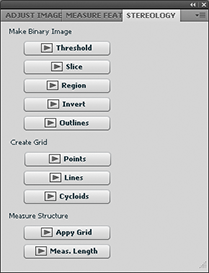
The Stereology Panel has 10 buttons in three groups. In most cases, if the image has not been previously converted
to a binary (black and white) image in which the structure(s) to be measured are black on a white background, the
first step will be to choose one of the buttons to perform this operation. Then the appropriate grid can be generated,
and finally applied to perform the measurement.
- Make Binary Image. The Threshold button allows a single threshold value to be set to separate light from dark regions.
The Slice button provides two thresholds for the upper and lower brightness settings to define the regions of interest.
Both of these functions also have automatic tools for selecting threshold values. The Region button allows clicking on
a point in the image whose color and brightness represent the areas to be selected, and setting tolerance values. The
Invert button reverses black and white, since the background is sometimes easier to define than the structures of
interest. The Outline button may be used after these operations if the surface area of the structures is to be measured
rather than the volume. All of these routines first create a new layer containing the current image and operate on that
layer, preserving whatever has been done previously.
- Create Grid. Three buttons are provided to generate Point grids (for measuring volume) or line grids (for measuring
surface area). The Lines button generates straight lines or circles, and the Cycloids grid generates cycloids. For
all of these grids, dialogs are presented in which appropriate values for the grid spacings can be entered so that
the structures are not oversampled. The number of points in a point grid, or the total length of the line grid, is
shown and should be recorded. The grid is generated in a new window sized to match the original image.
- Measure Structure. The Apply Grid button combines the binary image with the grid and counts the number of intersections,
which is shown and can be used with the previously recorded data on the grid to calculate the volume or surface area
of the structure. An overlay is also shown on the original image as a record of the grid and the location of the hits.
The Line Length button is used without generating a grid, to measure the total length of the outlines generated by the
Outline button under Make Binary Image. It shows the total line length and image area, from which the surface area
can be calculated.
A zip file containing the individual files needed to install the panels, including a readme.pdf file with detailed
step-by-step instructions for installation, can be downloaded for use with Photoshop CS4 running under
Windows XP or Vista or Mac OS X 10.5.
Any comments about these particular functions, or about the utility of panels in general,
would be welcome. Please send email to DrJohnRuss@GMail.com
Return to DrJohnRuss.com